Posts

Morgan Out Island 41 Pedestal Upgrade

Image
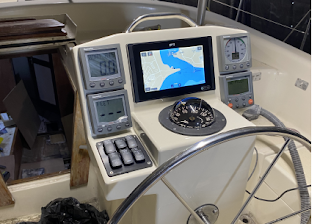
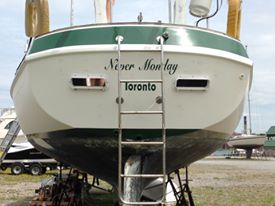
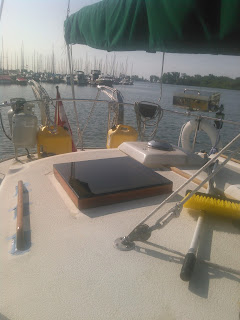
  Morgan Out Island 41 Pedestal Upgrade When we first bought our Morgan Out Island in 2015,  the Previous owner had started on a rudimentary console to hold sailing instruments that surrounded the existing binnacle compass.  As it was far from complete we discarded it and built a ply wood “pod” with the intention of housing the existing Raymarine ST60  trio of Speed, Depth and wind instruments.  Added to that I purchased a Garmin Echomap 7 inch plotter to give me some navigational data The original pod was functional but far too large and completely interfered with cockpit liveability.  If someone was sitting on the front cockpit seat (facing aft)  the pod was right in their face.  From the helm station, shorter users had difficulty seeing over it (originally designed for my viewing height).  The challenge was to keep the same analogue instruments, add switching and migrate to a larger 9 inch  MFD.  Some people now favour a single pane of glass approach with the MFD  serving as both th

Propane Locker (Part 2)

Image
Oh, glorious, glorious sanding.... (thanks Mads!!) We're back at it.  Working on the propane locker that is.  I try to limit my exposure to grinding fibreglass as i had a bad reaction to heavy fibreglass grinding when I was a teenager (allergic reaction,  my face swelled up like a chipmunk)     One of the problems with building anything with corners using a male plug mold is you tend to get a build up of fibreglass at the corners and a smooth finish on the inside and rough finish on the outside.  Most of the rough finish can be dealt with using a nice 7inch disc sander ( HF has a nice cheap one that has lasted me 5 years so far!!)  After demolding and initial grinding. I realised that there was substantial flare out the the bottom corner where sides wrapped around to the form the bottom and the bottom layers had wrapped up to the sides (rookie mistake I should have known this would happen).  Also because I used 1708 knitted fabric,  the locker is really strong, but all those thread

Propane locker part 1

Image
When  we first installed our propane system on Never Monday we lashed our propane tanks to the stern pulpit.  While this worked for keeping the tanks "vented"  and i'd done the same on a previous boat (also with 10lb tanks).  the result was a bit ugly and in incident where the stern of the boat got hung up on some piles made us plainly aware of how vulnerable this also left the tanks  Original tank hanging from rail.  We decided that the tanks needed more protection, both from the elements and to move them inside the the life lines to give them some additional protection.  We looked at commerical options but at close to $1000 for a locker that would only hold one tank,we knew that there had to be a better option.  After all they are just a fiberglass box!  In looking around at my options I found this blog post: Pheonix's custom fiberglass propane locker So I set out to build my own.... Step 1  was to decide on the dimensions.  We carry 2 10lb tanks for propane and wan

It all started with a little drip... (stern tube repairs- Summer 2019)

Image
Last spring it all started with a little drip... Fig. 1  In the spring of 2019 I was checking on the boat and found this little surprise waiting for me.  It was wet,  but not water wet,  It was hydraulic fluid wet!  and on a Morgan Out Island Hydraulic fluid can only come from one place, the steering system!  When we got the boat in 2015  the steering system had not had any fluid in it for a number of years.  We filled the system in 2016 to get her home and the system held fluid (and seemed to work well). After our initial fixes to get the boat up and running to bring her home  to Whitby Ontario we discovered over the winter  that the helm pump needed new seals, so that was rebuilt. Over the years We suspect that the original fabrication of the stern tube left a little to be desired in terms of quality and completeness.  On the inside of the keel there was a section of "deadwood"  that was made up of a small plywood bulkhead, fiberglass stern tube, foam an

Oswego to Rome, NY

Image
Wow, its been a busy 3 days,  and no good wifi for almost that long!! We arrived in Oswego, NY on tuesday afternoon and contrary ot what everyone says,  Oswego Marina HAS NO materials to build mast supports with!  Luckily there is a lumber store literally  a set of steps away! We spent the evening stripping the boat of all the sailing bits a bobs!  Wednesday morning we madly built a set of 3 supports.  One for each end and the middle support. The yard staff were great and got the rig down very quickly and safely!  We got compliments on the construction of our supports,  the yard manager said they usually have problems with the middle support being either too tall of too low!  ours fit just right!  After getting the masts secured (by this time is was just after noon) we headed out for our first locks on the Oswego section of the canal.  Ryan Sarah and Tracy handled  the lines like pro's ( sorry no photos as we were busy tending lines)  After the success of the first lo

The trip has finally begun!

Image
Finally, we're off!   After two and and a half summers of work we finally left the dock FOR REAL!!  Saturday morning September 9th we finally left our nice snug berth in Whitby and headed out onto the lake!  Bye Bye Whitby! The morning started out cool and calm with virtually no wind at all.  So we all bundled up with sweaters and fall coats to keep warm!  Of course Ryan used my gloves when we first cast off, so my gloves were wet while his gloves which were still nice and dry!  As the day continued the wind built up a bit, but not to much.  we only managed to see 8 knots of breeze on average. Our boat needs a bit more breeze to really get going We motor sailed the whole way across.  11 hours of watching this Anti-siphon discharge "peeing" is enough to make any trip seem soo much longer and trips to the bathroom more frequent!!  For those of you that don't know that's the discharge from the top of the anti-siphon loop for the engine!  It serves a

The Countdown has begun!!!

Image
The countdown has begun!! Were just 2 weeks from our planned departure date and the projects are still madly underway!  We just got back the plexiglass for our replacement hatches. and I have to admit they turned out great!! Aft cabin hatch The original hatches were vacuum molded plexi and were probably really nice when originally built in the 70's! The biggest issue I had with them is the oddball size!  the aft hatch I could have cut off the moulding in coamings and done alot of glass work to make a regular hatch fit,  but that idea ( for now) seemed way to involved!  So we built new hatches from African mahogany with smoked plexiglas tops bedded in Sikaflex. Forward cabin hatch!  Turned out pretty good too! We've spent the last 2 weeks getting the genoa luff tape replaced with the correct size for our new roller furling (oops)  buying a few engine spares (like the $120 water impeller!  Yikes!)  some extra filters,  connected the engine to the hot water tank s